
If you know your way around CSS or feel confident about trying my tutorials to customise your site, you’ll need to remove Shopify’s new Settings file (the thing that lets you choose colours in the Theme Editor. If you do this, changes to the Settings will no longer work – you’ll need to make all your colour and image changes via the CSS and theme files as detailed in my tutorials below. However, you can always change it back by reversing my tutorial below.
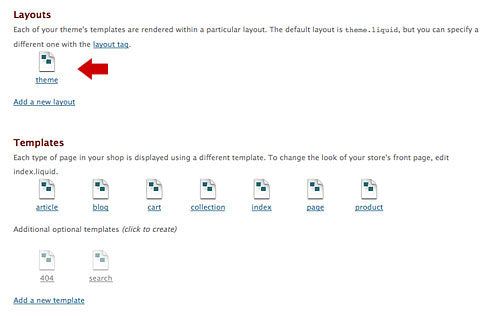
If you click into the Theme Editor, underneath the Settings area you’ll see a display of all the files that make up your shop.
Open your Theme file at the top of this area and look for this line, near the top
{{ 'style.css' | asset_url | stylesheet_tag }}Change ‘style.css’ to ‘blue.css’ and click Save at the bottom. This will change it back to the original blue style. You can also use ‘red.css’, ‘aqua.css’ and ‘green.css’ to view all four colour schemes. Once you’ve decided on one, just save the file and you’re done.
Have a look at the older tutorials for how to change your banner image and other customisations.
If you have any questions please email me or leave a comment. I don’t check comments all that often so do please email if you need a quick response.
May
07
Just a little post to share some different coloured cart and search icons for Prettify. All the colour options share the same red cart and search images but some of you have said you would prefer something that matches the banners more. Your wish is my command!

I’ve made a zip file which contains icons in pink, aqua, green, red and grey so you can choose what suits your site best.
>> Download the Prettify iconsThe easiest way to use these is to rename your chosen files to cart.gif and search.gif.
Then go to the Assets area of your Shopify Admin and into the Theme Editor.

Click the link to Upload a new theme asset and upload your chosen cart and search images. They’ll now appear in the list of files.
As you’ve overwritten the default images you should now see the new ones in your shop. You may have to force a refresh to see them.
I hope this helped you. Please leave a comment if you have any problems.
By popular demand, here are some tips on changing, moving and removing the text area on the Frontpage.
Again, we’ll be making changes in the Assets area of your Shopify Admin, using the Theme Editor.
Open the index.liquid file and look for the following code (at the bottom of the page):
<div id="articles"> {% for article in blogs.latest-news.articles limit: 1 %} <h3>{{ article.title }}</h3> <div class="article-body textile"> {{ article.content}} </div> {% endfor %} <p><a href="blogs/latest-news">All News >></a></p></div>This chunk of code is what controls the text. You can move it above your products table, or delete it completely.
The default option on Prettify is that it pulls in one blog post from the Latest News blog. Now, you may have noticed there isn’t actually a blog called Latest News in your Shopify shop! I’m going to blame Shopify for this – they were adding in the Blog functionality as I was coding it so it wasn’t present inVision and I got the name wrong somewhere along the line.
So, you have two options. You can create a new Blog called Latest News in the Blogs & Pages section of your admin, or you can change the code above. Just swap the two mentions of
latest-news for thePermalink/Handle of your existing blog, eg. frontpage, shop-updates or whatever you like.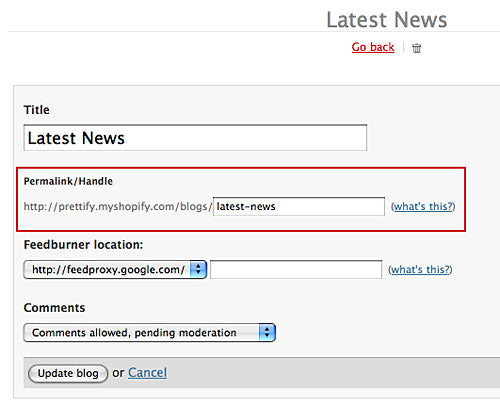
Once you’ve made the changes, save and view your shop.
You can then update your frontpage text by adding new posts to the corresponding blog.
One more thing – if you’d like to show more than one blog entry on your frontpage, you can edit this part of the code
{% for article in blogs.latest-news.articles limit: 1 %}and change the 1 on the end to any number you like.
I hope this helped you. Please leave a comment if you have any problems.
This guide shows how to create a collection of products that have sold out, with an option for customers to enquire about a product.
Creating a sold out collection
First thing to do is go to Collections in your Shopify Admin area and click on Add Smart Collection. With Smart Collections, you set up conditions so products are automatically included. Add a title and description of your choice and then set your conditions as below.
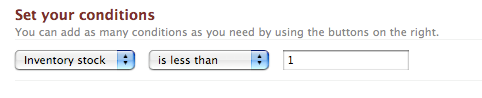
Click Create Collection and you now have a collection of all products that are out of stock. You can add a link to this collection in the Navigation area.
Adding a Sold Out button
Stage 2 is to add some code that will swap your Add To Card button for a Sold Out button.
You’ll need to design a Sold Out button that is a similar size to your Add To Cart button. If you’re using the default Prettify buttons then here’s one I created for you. Right-click to save it to your computer.

Again, we’ll be making the changes in the Assets area of your Shopify Admin, using the Theme Editor.
Click the link to Upload a new theme asset and upload your new button image. It will now appear in the list of files.
Editing the code
Open the product.liquid page from the templates at the top of the page.
Find this piece of code (near the bottom)
<div class="addtocart"> <input type="image" name="add" value="Add to Cart" id="add" class="button" src="{{ 'add.gif' | asset_url }}" /> </div>and replace it to the following code:
<div class="addtocart">{% if product.available == false %} <a href="mailto:YOU@YOUREMAILADDRESS.COM?subject={{ product.title }}"><img src="{{ 'soldout.gif' | asset_url }}" /></a>{% else %} <input type="image" name="add" value="Add to Cart" id="add" class="button" src="{{ 'add.gif' | asset_url }}" /> {% endif %} </div>Make sure you change YOU@YOUREMAILADDRESS.COM to your actual email address. If you’re using your own button image, you may also need to change soldout.gif to your button’s filename.
Save the file and view your shop in a new window. You will only see the sold out button on a product that is completely sold out in all variations.
You can see this code in action here.
I hope this helped you. Please leave a comment if you have any problems.
If there’s one bad thing about Shopify (and there may well only be one bad thing), it’s that they’re too modest. All the tips I’m going to give you can be found either in your Admin panel or in the Shopify Wikior Forums but so many Shopify users have no idea about them. Many of these can be added in a few clicks and might just change your life!
EASY
Whatever your skill level, these are must-do tips but they’re all really simple too.
Whatever your skill level, these are must-do tips but they’re all really simple too.
Turn around abandoned orders
Despite being listed in your Orders page as clear as day, this is like the hidden gem of Shopify. Just go to your orders page and click Abandoned in the right sidebar. You’ll now see a list of all orders that that never completed payment. Some will be you testing things, some will be by Mr aaa who likes to pretend shop regularly, some will be customers you recognise who changed their mind (or had a browser crash) mid-order and filled their basket again. The rest will be your mystery almost-customers. Except they’re not mysteries as they entered their contact details. So contact them and ask them what the problem was!
I contact almost all of mine with a standard email that asks if they were having any issues with the shop or PayPal that I can help with and gives them a link to their saved cart in case they want to have another go. You can get the cart link from their order page. Maybe 50% of these customers email me back, usually because PayPal gave them an error but once because the customer wanted 3 of something and I only had 1 available! What have you got to lose?
Having said this, I would advise against repeatedly contacting these people or adding them to your mailing list (even if they agreed to marketing). Be cool.
Add Google Analytics
Shopify offers basic stats with most packages but Analytics will give you much more detailed info on where your customers are coming from, what they’re looking at and what your conversion rate is from visits to sales. To add it, just follow the instructions in this guide and you’ll be all set!
Add shipping deals
Shopify quietly slipped in price-based shipping options a while back which makes things a lot easier. Now, as well as your usual weight-based options, you can add special deals for your best customers. For instance, I offer free UK shipping on all orders over £20.
To set this up, just go to Preferences > Shipping and click on ‘Add price-based rate’ for the relevant regions.
Set up a mailing list
Shopify automatically collects customer details for you from those customers that accept marketing. You can download these in the Marketing section. Set up a mailing list with a company like Constant Contact or MailChimp and sign them up. If you keep your newsletters to once a month and offer exclusive info and deals they’ll hopefully come back and buy again sometime.
Extra tip! If you don’t get many people accepting marketing, it could be the wording in checkout as the default text makes it a little unclear who is going to use the information. If you go to Preferences > General you’ll see a drop down box for Checkout Language. Choose ‘Create a new translation’ and you can edit any or all the wording in your checkout.
MEDIUM
If you’re confident with computers and dabble a bit in code then you should manage these fine.
If you’re confident with computers and dabble a bit in code then you should manage these fine.
Use your own domain name
Why have askingfortrouble.myshopify.com when you can have shop.askingfortrouble.org? It looks so much more professional and it hardly takes any effort. Just how much effort depends on your domain hosting company. Mine took 1 email and a whole 3 minute wait (I love United Hosting). Your hosting company may be idiots who take weeks to mess it up repeatedly before finally getting it right. I’ve seen it happen.
Have a look at the DNS section of the Shopify wiki which has details for the major hosting companies. Good luck!
Add a customer feedback page
This is a hack but a good one. Your customers may be too shy to email you personally and give you feedback on your products or service but give them a comment form and they might be more keen.
I just set up a new blog (in Blogs & Pages) called Customer Feedback and then a new post in that blog also called Customer Feedback. Make sure comments are turned on. You might want to set them to be moderated as well. Add some friendly text inviting feedback and publish it.
Your feedback post will have a ridiculously long url but use a service like tinyurl to create something more memorable (mine is tinyurl.com/troublefeedback). Add that link to your shop menu, emails etc. for everyone to see.
Your customers can now leave comments and prospective customers can see how great everyone thinks you are. Win-win!
Customise your Email Notifications
If you go to Preferences > Email Notifications you’ll see a list of Email templates for the various auto emails. They are generally fine but why not personalise them? Even if you just add your own greeting and sign off, it will look a lot more personal. Even better, you can add helpful information or special offers.
For instance, my order confirmation email tells the customer I ship daily and gives them links to my blog and mailing list. My shipping confirmation email gives the customer estimates for delivery and a link to my customer feedback page so they can let me know what they think when it arrives.
Just click on the emails to edit them and save when you’re done. If you’re unfamiliar with code then copy and paste the original text into Notepad or something as a backup. Be careful of any content within curly brackets {} unless you know what you’re doing.
A BIT MORE COMPLEX
If you’re confident about editing your theme templates then these tips are for you.
If you’re confident about editing your theme templates then these tips are for you.
Brand your checkout
If you’ve never tried out the checkout part of your shop then go have a look now. Ugly isn’t it? Your shop may be beautifully designed and branded but the default checkout makes for a jarring change and might even give your customers second thoughts about trusting you with their money. We don’t yet have access to edit the checkout pages but we can change the look with css.
You’ll have a very hard job making your checkout match the rest of your shop exactly so my preferred plan is usually to keep it clean and white with a simple logo. This way your customer is aware they’ve moved on from shopping into buying, but are reassured that they’re still dealing with you and that you’re a professional.
This thread on the forums has some ideas and code to remove most of the formattting to give you a blank sheet, or feel free to email me and I’ll send you mine.
Make SEO even easier
Shopify is already very search engine friendly but there are some additions you can make to the code that will improve things further by automatically adding individual meta information for each page from your descriptions, tags and content.
Read this thread on the Shopify forum for details (and make sure you read the whole thread!).
Customise your search and error pages
The Search and 404 error pages have recently been opened up for editing so personalise them to match your site. 404 pages in particular are a great opportunity to do something fun and original to amuse anyone unlucky enough to click a bad link.
They’re also a marketing opportunity. Anyone looking at your 404 page is lost so suggest somewhere for them to go! On my main shop, as well as a search box and all the usual navigation, I’ve added a few of my Featured Products and a way to browse the shop using tags. Take a look
For error pages, there are some basic code ideas in this thread, or email me and I’ll send you a copy of mine.
Do just about anything!
There really is no end to the custom features you could add to your shop. You’ll find lots of ideas in the Shopify Wiki or Forums, as well as designers and coders happy to help you work stuff out.
I hope you have fun with these tips. If you’d like some help, or any of the files I mention, feel free to email me via hello AT askingfortrouble.org. I’m also available to design custom Shopify themes and features – see my portfolio.
In Prettify, the top navigation shows the same links as the footer. This is because the default Shopify setup only has two link lists available. It makes much more sense if you have a different set of links for the top navigation and luckily, it’s very easy to do!
Go to the Navigation section of your Admin panel.
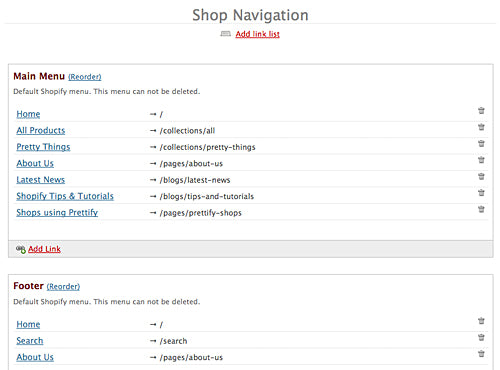
Set up a new link list, call it Top and add any links you want.
Now we need to make a small change in the Assets area of your Shopify Admin, using the Theme Editor.
Open the theme.liquid file and look for the following code (near the top of the page):
{% for link in linklists.footer.links %}change the word footer to top so the line looks like this:
{% for link in linklists.top.links %}Save and view your shop.
I hope this helped you. Please leave a comment if you have any problems.
My second guide is how to change the standard Prettify banners and avatar to your own design.
Prettify has four colour choices so first thing to do is find the one that closest matches your brand. There’s a guide here on how to change the colours.
Once you’ve chosen your colour scheme, you can create your banner and avatar images. The Prettify banner is 900×100 pixels in size and the avatar is 75×75 pixels. You should try to keep yours to a similar size. You can create your images using any graphics program and you should save them as either .gif, .jpg or .png files. Keep a note of the image names and dimensions as you’ll need these later. Your avatar should be saved with the filename avatar.jpg if possible as this will make things much easier later.
Again, we’ll be making the changes in the Assets area of your Shopify Admin, using the Theme Editor.
Click the link to Upload a new theme asset and upload your new banner and/or avatar images. They’ll now appear in the list of files.
To change the banner
Open the corresponding stylesheet for the colour theme you are using. If you’re using the blue theme, then open blue.css, the red uses red.css etc. For this example I’m using the blue.css.
Find this piece of code (near the top)
#header { background-color: #fff; background-image:url(header-blue.gif); }and change header-blue.gif to the name of your banner file. It may be something like banner.gif, or logo.jpg. You only need the file name, not a full url.
Save the file and view your shop in a new window. You may need to refresh your browser to see the changes.
If your new banner image is not 100 pixels high then there is one more change to make. Go back to the Theme Editor and open the shop.css file. Scroll down until you see this code:
#header { clear:both; background-repeat:no-repeat; height:100px; padding-bottom:10px; }and change the height (100px) to the height of your new banner. Save and view your shop.
Removing the Shop Name from the banner
If you don’t want your shop name written over your banner image then open the shop.css file. Look for the following code:
#header h1 { text-align:left; }and edit so it looks like this:
#header h1 { text-align:left; display: none; }This will hide the header text. Save and view your shop.
Changing the avatar image
If your avatar was named avatar.jpg it will have replaced the old avatar image. View your shop to see your new avatar in place. You may need to refresh the page to see it.
If your file has a different filename then open the theme.liquid file and look for the following code (about half way down the page):
<div class="avatar">{{"avatar.jpg" | asset_url | img_tag }}</div>Change avatar.jpg to your new file name. Save and view your shop.
I hope this helped you. Please leave a comment if you have any problems.
My first guide is how to change between the four Prettify colour themes to choose the one most suited to your shop.
All the changes we’ll be making take place in the Assets section of your Shopify Admin area. On the first screen, you’ll see the option to download a copy of your theme. It’s always a good idea to do this before making any changes to the theme, in case you break something!
If you click into the Theme Editor, you’ll see a display of all the files that make up your shop.
Prettify has four colour schemes, which you can try out by editing your theme.liquid file at the top of the page. Open the file and look for this line, near the top
{{ 'blue.css' | asset_url | stylesheet_tag }}Change ‘blue.css’ to ‘red.css’ and click Save at the bottom. Then open your shop in a new window to view the red theme.
Repeat with ‘aqua.css’ and ‘green.css’ to view all four colour schemes. Once you’ve decided on one, just save the file and you’re done.
This is collection from a web site.


NIce.Proccede on
ReplyDeleteThanks
bulu