Showing posts with label Tutorial. Show all posts

Friday, March 16, 2012

Update/Reinstall Nokia Firmware Offline Using Phoenix (Free Flashing Tutorial)

nokai1 Update/Reinstall Nokia Firmware Offline Using Phoenix (Free Flashing Tutorial) Some time you have seen that some bugs are there in your mobile like your mobiles calculator is not running properly or browser not opening etc. it may some problem in your firmware and can be solved by updating or reinstalling your firmware.There are different types of methods like using nokia software updater, by using nokia care,By using phoenix suite for store to update nokia firmware. but best of them is using phoenix method.many peoples are facing problem to update nokia phone software and some got fails so today i am here to guide you step by step with phoenix method so lets start.

#1. Requirements


  • A Computer Having At least 512 MB ram
  • Nokia original Usb cable for your phone
  • Phoenix Software (Flashing Software) Get It From Below Download Link With Resume Support
Download Link for Phoenix :- http://www.fileflyer.com/view/HNKQK9BVKQHUBH

#2. Find And Download Latest firmware For Your Mobile

In order to update or reinstall Firmware offline you have to find and download  latest firmware for your mobile so you need to follow this tutorial

[How-To] Find And Download Latest Nokia Firmware For Your Phone (Free)

#3. Lets Start To Update/Reinstall Firmware

  1. First of all it is recommended to remove all Nokia tools from your pc so please remove Nokia Pc Suite, Nokia Software Updater, Etc
  2. Reboot Your Pc
  3. Install Phoenix 2010 (Don’t Install With out Rebooting Your Pc) don’t Change in Directory Name
  4. Install Firmware You have downloaded in step 2 (downloaded From blue-nokia) where you have installed Phoenix (C:Program FileCommon filesNokiaDataPackageProductsAnd Here Create Folder Named RM-XXXX) Where XXXX is your firmware number dial *#0000# and check RM-XXXX
  5. Now Plug-in Your Mobile To Pc And Wait Till it install Drivers
  6. Now Open Phoenix And Go-to File>>Scan Product refer below screen shot updatefrimware1 thumb Update/Reinstall Nokia Firmware Offline Using Phoenix (Free Flashing Tutorial)
  7. Now It Will Show Your Device Info
  8. Now Navigate to Flashing>>Firmware Update Have a Look of Below Screen Shot
    updatefrimware2 thumb Update/Reinstall Nokia Firmware Offline Using Phoenix (Free Flashing Tutorial)
  9. Now as you click on Firmware Update you will see following screen it will ask you to enter Product Code then click on browse updatefrimware3 thumb Update/Reinstall Nokia Firmware Offline Using Phoenix (Free Flashing Tutorial)
  10. As You Click on Browse You will see following screen Just Select Your Product Code From it updatefrimware4 thumb Update/Reinstall Nokia Firmware Offline Using Phoenix (Free Flashing Tutorial)
  11. As You Select The Code following screen will appear to you then click on Refurbish and flashing will start updatefrimware5 thumb Update/Reinstall Nokia Firmware Offline Using Phoenix (Free Flashing Tutorial)
  12. Refer Following Screen Its Shows Flashing in Progress updatefrimware6 thumb Update/Reinstall Nokia Firmware Offline Using Phoenix (Free Flashing Tutorial)
  13. After That You will get Conformation message like this updatefrimware8 thumb Update/Reinstall Nokia Firmware Offline Using Phoenix (Free Flashing Tutorial)
  14. After Completing flashing process you can see following screen then click on close

    updatefrimware9 thumb Update/Reinstall Nokia Firmware Offline Using Phoenix (Free Flashing Tutorial)

[How-To] Find And Download Latest Nokia Firmware For Your Phone (Free)

nokai 150x117 [How To] Find And Download Latest Nokia Firmware For Your Phone (Free)Hi Everyone,
Yesterday I got following Message in my facebook profile from my friend
hi  jigar,
recently i am trying to to find latest firmware for my n73 from last 2 weeks but still i had not get any one firmware so can you please help me by finding out  latest firmware for my mobile?
so today i am going to guide you how can you find latest firmware for your nokia mobile so please go ahead and review my work

#1. Lets Find out Latest Firmware


  • First of all Check your current firmware version by dialing *#0000# in your mobile
  • Navigate Your Browser To http://blue-nokia.com/index02.html you can Chose Your Phone Type in upper right sidebar check following screen shot
    frimware1 thumb [How To] Find And Download Latest Nokia Firmware For Your Phone (Free)
  • As you select your phone type it will redirect you to your firmware data packages refer following screen shot frimware2 thumb [How To] Find And Download Latest Nokia Firmware For Your Phone (Free)
  • Now find latest version from it.

#2. Lets Download Firmware


  • As Soon as You find latest version for your firmware click on download beside it refer following screen shot
    frimware3 thumb [How To] Find And Download Latest Nokia Firmware For Your Phone (Free)
  • Now As You click on download you will be redirect to  rapid share link to download it with resume support and fast please read This guide

Sunday, March 11, 2012

GET 100MB ON ETISALAT NETWORK FOR JUST FILLING A FORM ONLINE|Free Browsing|Hacking Tips|Etisalat Zone|Hidden Tips|


To Get 100MB Free on Etisalat Network, You need to Fill out the Form available Online @ http://easyblaze.etisalat.com.ng/register.html together with your Correct Knowledge, Then Click on the Register Button.

http://www.royalthomian.info/etisalat%20logo%202.jpg

=> Not any Etisalat Users? You can also Participate and you will be given a 100MB for your Network.

Get N3869.60 Airtime On Airtel Nigeria With Just 3 Steps|ICT News|Tips|Tricks|Secreat|Mobile

You wonder how to go about this?

https://blogger.googleusercontent.com/img/b/R29vZ2xl/AVvXsEiXUwMBd6HoCp7UgqmTlju_X2OHYb3nfQ910ab0MJqBRe2-8k3sE-1YLoJRSA5_EtX-n2JoIGZBqQlnXZl4AEFbKVZV9jkbQt_PQ3ZPFjqaAtnlwFGwFTzojCkgwZ-qyfUqfwPOCW6dWaM/s1600/bharti-logo.jpg

I couldn't believe this until i tested it and it works for me.

From my research, it works on all airtel Sims.

Note this is not a promo from Airtel Nigeria...

Also note that as the time of posting this updates, the tricks above is confirmed working! And it can be block unaware by your Internet Service provider.
Now to get it done!


Requirements!
-Airtel Nigeria Sim
-Minimum of N100 airtime
follow the steps below to grab N3,869.60 airtime on Airtel Nigeria Network.
Step 1. Dial *447# and you will get a message which will be in this form ''WELCOME TO AIRTEL BIG FAMILY....."

Note: you may get an error message repeatedly i.e system busy...but keep trying until you get it done!
And have this in mind many users are trying this at the same time.
Step 2. Call any airtel line for at least 60seconds then end the call

Now dial *446# and ignore any response you get thereafter
Step 3. Finally dial *123*9# to check your bonus airtime.
You will get this that you have been given N3869.60 bonus to call any airtel Nigeria line.
Then you're done!

Sunday, March 4, 2012

7 Tips to Wake Up and Get Out of Bed Fast|Health|Tips|Fitness|Rule|Guide|Self|Doctor|Hospital|Advice|Efficiency|Exercise|Habit


You're late to work, again. No matter how much you reason with yourself, your lateness is probably due to the fact that you couldn't get out of bed. It's always unpleasant to drag yourself out of bed, so here are some tips to help you wake up alert and get you out of bed quickly:
  • Assess your health. Your drowsiness in the morning might be health-related. Perhaps you need a better diet and exercise plan or maybe you have sleep apnea. If you've been doing everything right, go to a doctor for an expert opinion.
  • Coffee on your bedside table. This is for extreme cases, but leaving some coffee or another caffeinated drink like Mountain Dew on your bedside table might be a good way to get yourself out of bed.
  • Place your alarm clock strategically. If you place your alarm clock across the room or outside your door, this might force you walk to the clock to shut it off.

Friday, February 24, 2012

Make a Pop-up Subscribe Form Like Aweber

This is my first Guest Article For The Blog And My Blogging Carrier Too..
First Of All Let Me Thank Mohammad Mustafa Sir to allow me to Post this article for you all. Have you ever heard about the Aweber Email Marketing Solutions ? If Not then i bet you must have seen EMail Signup Forms in Popular websites... They use Aweber. Though it is not free but it is efficient so they use that. But here In My Article I'll Let you to integrate Aweber Features and FeedBurner Features and install it on your Blog. So keep Reading And Keep Enjoying !!

What Will we Get From This ?

The main Reason why to use is because it will not only make your Blog Look Professional But Also will increase the EMail Subscriptions to your Blog. Its a modified version of the model subscribe box created by . Lets first see a demo

Add it To Blogger


You can Install This Widget Easily in your Blog By Following These Simple Steps....
Before you edit any template it's better to keep a Backup..
So First Backup your Template. Now Go To Design>Edit Html>Select Expand Widgets...

Step 1 : The CSS You Need To Search The Following Piece Of Code By Pressing [Ctrl+F]
]]></b:skin>
Now Paste The Bellow Code Just Before it.
/*
   ColorBox Core Style:
   The following CSS is consistent between example themes and should not be altered.
*/
#colorbox, #cboxOverlay, #cboxWrapper{position:absolute; top:0; left:0; z-index:9999; overflow:hidden;}
#cboxOverlay{position:fixed; width:100%; height:100%;}
#cboxMiddleLeft, #cboxBottomLeft{clear:left;}
#cboxContent{position:relative;}
#cboxLoadedContent{overflow:auto;}
#cboxTitle{margin:0;}
#cboxLoadingOverlay, #cboxLoadingGraphic{position:absolute; top:0; left:0; width:100%;}
#cboxPrevious, #cboxNext, #cboxClose, #cboxSlideshow{cursor:pointer;}
.cboxPhoto{float:left; margin:auto; border:0; display:block;}
.cboxIframe{width:100%; height:100%; display:block; border:0;}
/*

    User Style:
       Change the following styles to modify the appearance of ColorBox.  They are
       ordered & tabbed in a way that represents the nesting of the generated HTML.
    */
    #cboxOverlay{background:#000;opacity:0.5 !important;}
    #colorbox{
            box-shadow:0 0 15px rgba(0,0,0,0.4);
           -moz-box-shadow:0 0 15px rgba(0,0,0,0.4);
            -webkit-box-shadow:0 0 15px rgba(0,0,0,0.4);
           }
          #cboxTopLeft{width:14px; height:14px; background:url(https://blogger.googleusercontent.com/img/b/R29vZ2xl/AVvXsEhKXezP3OvN-AAi0z4Kmnwa6nk9fUbj2skfPry9zi8lAOFZyq2kGhNQcZ7SwUo6qdgKTp9ntfnH7sGO7rdUJIFOvNYyFjW8rLUvTYAebDf5woaa38sbWetiEAu9uPLZnaJWm9IiopgBuKg/s1600/controls.png) no-repeat 0 0;}
#cboxTopCenter{height:14px; background:url(https://blogger.googleusercontent.com/img/b/R29vZ2xl/AVvXsEjXArjUmtR62C7ZSk-XrqOtM1WtCblpCKpTv7SaS3PU0vbY9O9xv0SiQYPy25PS4IaBAWzoTpD7zs3vTCRmwhBft1Jz8UUyzXrR9nIOO7q6nGitzeCE-wUQGV6DVTdyrrami7Pow1H0cEw/s400/border.png) repeat-x top left;}
    #cboxTopRight{width:14px; height:14px; background:url(https://blogger.googleusercontent.com/img/b/R29vZ2xl/AVvXsEhKXezP3OvN-AAi0z4Kmnwa6nk9fUbj2skfPry9zi8lAOFZyq2kGhNQcZ7SwUo6qdgKTp9ntfnH7sGO7rdUJIFOvNYyFjW8rLUvTYAebDf5woaa38sbWetiEAu9uPLZnaJWm9IiopgBuKg/s1600/controls.png) no-repeat -36px 0;}
    #cboxBottomLeft{width:14px; height:43px; background:url(https://blogger.googleusercontent.com/img/b/R29vZ2xl/AVvXsEhKXezP3OvN-AAi0z4Kmnwa6nk9fUbj2skfPry9zi8lAOFZyq2kGhNQcZ7SwUo6qdgKTp9ntfnH7sGO7rdUJIFOvNYyFjW8rLUvTYAebDf5woaa38sbWetiEAu9uPLZnaJWm9IiopgBuKg/s1600/controls.png) no-repeat 0 -32px;}
    #cboxBottomCenter{height:43px; background:url(https://blogger.googleusercontent.com/img/b/R29vZ2xl/AVvXsEjXArjUmtR62C7ZSk-XrqOtM1WtCblpCKpTv7SaS3PU0vbY9O9xv0SiQYPy25PS4IaBAWzoTpD7zs3vTCRmwhBft1Jz8UUyzXrR9nIOO7q6nGitzeCE-wUQGV6DVTdyrrami7Pow1H0cEw/s400/border.png) repeat-x bottom left;}
    #cboxBottomRight{width:14px; height:43px; background:url(https://blogger.googleusercontent.com/img/b/R29vZ2xl/AVvXsEhKXezP3OvN-AAi0z4Kmnwa6nk9fUbj2skfPry9zi8lAOFZyq2kGhNQcZ7SwUo6qdgKTp9ntfnH7sGO7rdUJIFOvNYyFjW8rLUvTYAebDf5woaa38sbWetiEAu9uPLZnaJWm9IiopgBuKg/s1600/controls.png) no-repeat -36px -32px;}
    #cboxMiddleLeft{width:14px; background:url(https://blogger.googleusercontent.com/img/b/R29vZ2xl/AVvXsEhKXezP3OvN-AAi0z4Kmnwa6nk9fUbj2skfPry9zi8lAOFZyq2kGhNQcZ7SwUo6qdgKTp9ntfnH7sGO7rdUJIFOvNYyFjW8rLUvTYAebDf5woaa38sbWetiEAu9uPLZnaJWm9IiopgBuKg/s1600/controls.png) repeat-y -175px 0;}
    #cboxMiddleRight{width:14px; background:url(https://blogger.googleusercontent.com/img/b/R29vZ2xl/AVvXsEhKXezP3OvN-AAi0z4Kmnwa6nk9fUbj2skfPry9zi8lAOFZyq2kGhNQcZ7SwUo6qdgKTp9ntfnH7sGO7rdUJIFOvNYyFjW8rLUvTYAebDf5woaa38sbWetiEAu9uPLZnaJWm9IiopgBuKg/s1600/controls.png) repeat-y -211px 0;}
    #cboxContent{background:#fff; overflow:visible;}
        #cboxLoadedContent{margin-bottom:5px;}
        #cboxLoadingOverlay{background:url(https://blogger.googleusercontent.com/img/b/R29vZ2xl/AVvXsEhAbXrSy70wG9w9_vZqzgSSWmhPnLXfM5CtMnIOF6mLG1W1MREv105_XFdJVyWLZWCVSE13qTJ4EdM0_4miRKZSuJF1cxcrJdTyEGZNuoOaHO85rAS7n6iQmhiYMJLphsC_GBO5W6PnXcU/s400/loadingbackground.png) no-repeat center center;}
        #cboxLoadingGraphic{https://blogger.googleusercontent.com/img/b/R29vZ2xl/AVvXsEgelON8k3VZ24U9s56RTfCVr7R65mxO4WaSyyCPRcFmVwcH-shy8GXsLUnMpftFU5llLN7AklXhlrbWP-acG7a2tSank6RxLJUNs_dOkSLdVcdMHxTSy2-7pKE4Gwr9HqPsrnty0Agyhv0/s400/loading.gif) no-repeat center center;}
        #cboxTitle{position:absolute; bottom:-25px; left:0; text-align:center; width:100%; font-weight:bold; color:#7C7C7C;}
        #cboxCurrent{position:absolute; bottom:-25px; left:58px; font-weight:bold; color:#7C7C7C;}
        #cboxPrevious, #cboxNext, #cboxClose, #cboxSlideshow{position:absolute; bottom:-29px; background:url(https://blogger.googleusercontent.com/img/b/R29vZ2xl/AVvXsEhKXezP3OvN-AAi0z4Kmnwa6nk9fUbj2skfPry9zi8lAOFZyq2kGhNQcZ7SwUo6qdgKTp9ntfnH7sGO7rdUJIFOvNYyFjW8rLUvTYAebDf5woaa38sbWetiEAu9uPLZnaJWm9IiopgBuKg/s1600/controls.png) no-repeat 0px 0px; width:23px; height:23px; text-indent:-9999px;}
        #cboxPrevious{left:0px; background-position: -51px -25px;}
        #cboxPrevious.hover{background-position:-51px 0px;}
        #cboxNext{left:27px; background-position:-75px -25px;}
        #cboxNext.hover{background-position:-75px 0px;}
        #cboxClose{right:0; background-position:-100px -25px;}
        #cboxClose.hover{background-position:-100px 0px;}
        .cboxSlideshow_on #cboxSlideshow{background-position:-125px 0px; right:27px;}
        .cboxSlideshow_on #cboxSlideshow.hover{background-position:-150px 0px;}
        .cboxSlideshow_off #cboxSlideshow{background-position:-150px -25px; right:27px;}
        .cboxSlideshow_off #cboxSlideshow.hover{background-position:-125px 0px;}

/*-----------------------------------------------------------------------------------*/
/*    box popup
/*-----------------------------------------------------------------------------------*/
#subscribe {
    font: 12px/1.2 Arial,Helvetica,san-serif;
}
#subscribe a,
#subscribe a:hover,
#subscribe a:visited {
    text-decoration:none;
}
.box-title {
   color: #2C2D31;
   font-size: 20px;
   font-weight: bold;
   margin: 10px 0;
   text-align: center;
}
.box-tagline {
   color: #999;
   font-size: 14px;
   margin: 0;
   text-align: center;
}
#subs-container {
    padding: 35px 0 30px 0;
    position: relative;
}
.box-side {
    width: 170px;
    text-align: center;
}
.box-side.left {
   padding: 0 30px 0 15px;
    border-right: 1px solid #ecedf3;
}
.box-side.right {
    float: right;
   margin-top: -223px;
    margin-right: 10px;
}
.box-icon {
    width: 72px;
    height: 54px;
    padding: 6px 0 0 0;
    margin: 0 auto;
}
.box-icon a.rss{
    display: block;
    width: 70px;
    height: 56px;
    margin: 0 auto;
}
.box-icon a{
    display: block;
    width: 72px;
    height: 54px;   
}
.box-icon a.email img,
.box-icon a.rss img {
   margin: -5px 0 0;
    border: 0 none;
}
.box-side h4,
.box-side h4 a {
    font-size: 14px;
    line-height: 14px;
    color: #f26535;
    font-weight: bold;
}
.box-side h4 { margin: 20px 0 10px 0; }
.box-side h5 {
    font-size: 11px;
    color: #5e6066;
    line-height: 18px;
    margin: 0 0 20px 0;
}
a.sub {
   background: url("http://imgboot.com/images/cybersidh/subscribebutton.png") no-repeat scroll 0 0 transparent;
   color: #996633;
   display: block;
   height: 44px;
   line-height: 29px;
   margin: 0 auto;
   text-indent: -999em;
   width: 130px;
}
.box-side h4 a:hover {
    color: #f26535;
}
#box-or {
   background: #fff;
   font-size: 12px;
   font-weight: bold;
   height: 25px;
   line-height: 25px;
   margin: -115px 0 0 208px;
   position: absolute;
   width: 20px;
}
a:link, a:visited {
border:none;
}
.demo {
display:none;
}

Now Hit Prievew, If Every Thing Works Fine then Save The Template..

Step 2 : The Html In This Part you'll add the widget to your Blog !!
Goto :: Design>Page Elements>Add Gadget>Html/Javascript
Now Paste The Following Code In It.
<script src='http://ajax.googleapis.com/ajax/libs/jquery/1.5/jquery.min.js'></script>
<script src="http://sidharth12.googlecode.com/files/jquery.colorbox-min.js"></script>
<script type="text/javascript">
jQuery(document).ready(function(){
   if (document.cookie.indexOf('visited=true') == -1) {
       var fifteenDays = 1000*60*60*24*15;
       var expires = new Date((new Date()).valueOf() + fifteenDays);
       document.cookie = "visited=true;expires=" + expires.toUTCString();
   $.colorbox({width:"480px", inline:true, href:"#subscribe"});
       }
});
</script>
    <!-- This contains the hidden content for inline calls -->
    <div style='display:none'>
        <div id='subscribe' style='padding:10px; background:#fff;'>
        <h2 class="box-title">Never Miss Any Update From Us!</h2>
               <h2 class="box-tagline">Enrich Your Inbox.[402+ Readers]</h2><br/>
               <form style="border:1px solid #ccc;padding:3px;text-align:center;" action="http://feedburner.google.com/fb/a/mailverify" method="post" target="popupwindow" onsubmit="window.open('http://feedburner.google.com/fb/a/mailverify?uri=ILibrary', 'popupwindow', 'scrollbars=no,width=560,height=540');return true"><p>Enter your email address:</p><p><input type="text" style="width:140px" name="email"/></p><input type="hidden" value="ILibrary" name="uri"/><input type="hidden" name="loc" value="en_US"/><input type="submit" value="Subscribe" /><p>Delivered by <a href="http://feedburner.google.com" target="_blank">FeedBurner</a> | Powered By <a href="http://www.mybloggertricks.com">MBT</a></p></form>
        <br/><h2 class="box-tagline">Subscribe us today and get Quality Articles for free.</h2>
</div>
</div>

Important :
Remove The Red Colored ILibrary With You FeedBurner ID.
Ignore The Line In Pink If Your Blog Already has JQuery.

Thursday, July 7, 2011

How To Place Adsense Below Post Title For Higher CTR

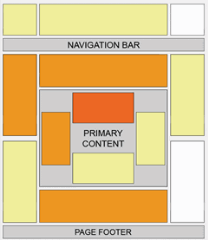
adsense best placement heat mapWhy below post title? Because it is the position with the highest CTR (click-through rate). In other words the ad placed there will bring the most money.
According to the Adsense ads positioning guideline published by Google, the best performing Adsense ad position is above the primary content i.e. above the blog post. This is illustrated by the heat map on the right.
Placing an ad below post title (above post content) is a not at all difficult. All you have to do is create an ad unit on Google Adsense website, get the code and add it to the specified location in your blog template.
(You can’t use Blogger’s Inline Adsense or Adsense gadget because it doesn’t have the option to add an ad under post title).
Here we go,

1. Preparing Adsense ad code

  1. Log in to Google Adsense (opens in tab/window) to create a new ad unit.
  2. For best results choose wide ad size -either 300x250 Medium Rectangle or 336x250 Large Rectangle format. Make sure you assign a new ad channel to it for performance monitoring purposes.
  3. When the setup is complete, you will be given a code.
  4. Run the code through an HTML escape tool to escape special characters in the code. The ad won’t appear if you use the original unescaped ad code.
  5. Copy the escaped code.

2. Adding ad code to the template

  1. Go to Dashboard > Design > Edit HTML.
  2. Tick the Expand Widget Templates check box on top right of the HTML window.
  3. Look for the following line in your HTML code:
    <data:post.body/>
  4. Paste the escaped ad code right above the line, like so:
    1<b:if cond='data:blog.pageType == &quot;item&quot;'>
    2 PLACE AD CODE HERE
    3</b:if>
    the conditional tag in lines 1 and 3 will make the ad appear only on post pages. If you want the ad to appear on all pages, just remove the lines.
  5. Save and view your blog.

3. Monitor ad performance

Make sure you monitor the ad performance. Don’t automatically assume it succeeds in increasing CTR without seeing the actual results.
No two blogs are the same, what works on most blogs may or may not work on yours. If you don’t see positive changes, test again with different ad types, formats, colors and/or placements.
Enjoy!